The data preparation steps that are described on this page are part of the DataChangers Microsoft Data Science Azure Machine Learning Workshop that can be found here.
Using Azure Machine Learning Workbench to prepare the data for this workshop is optional. Any other data preparation tool can be used if you do not want or cannot use AML Workbench. The data requirements are described in the MD2C workshop.
If you choose to prepare the data with AML Workbench, the following steps of the MD2C workshop can be skipped:
- 2.1 – change column separator and decimal symbols
- 2.7 – convert column z4 to a numeric using the Execute R Script module
- 2.8 – inspect column z4
- 2.9 – delete error row
Please be aware that skipping these steps has impact on the rest of the workshop. For example the Execute R Script module will not be required anymore (step 2.7), but is still shown in the workshop screenshots.
Azure Machine Learning Workbench Introduction
Microsoft recently released previews of the next generation of Azure Machine Learning (AML):
- the AML Workbench, a cross-platform client for AI-powered data wrangling and experiment management,
- the AML Experimentation service to help data scientists increase their rate of experimentation with big data and GPUs, and
- the AML Model Management service to host, version, manage and monitor machine learning models.
The AML Workbench is a cross-platform client application that runs on Windows and Mac and serves as a control panel for your development lifecycle. It is a great environment to start developing machine learning models. It is open, extensible and flexible, allowing developers and data scientists to author models in Python, PySpark and Scala. It supports integration with Jupyter Notebooks and with popular IDEs, including Visual Studio Code and PyCharm. One of its most exciting features is the new AI-powered data wrangling technology. Building on advanced research in program synthesis (PROSE) and data cleaning, Microsoft has created a data wrangling experience that drastically reduces the time that data scientists have to spend in transforming data for machine learning.
The data preparation steps of this workshop are based on AML Workbench only. The AML Experimentation service and AML Model Management service are not in scope.
Installation
Create Azure Machine Learning accounts in the Azure portal and install Azure Machine Learning Workbench on your machine by following the 4 steps below. Detailed instructions can be found here: https://docs.microsoft.com/en-us/azure/machine-learning/preview/quickstart-installation
- Sign in to the Azure portal
- Create Azure Machine Learning accounts
- Install Azure Machine Learning Workbench on Windows / Install Azure Machine Learning Workbench on macOS
- Run Azure Machine Learning Workbench to sign in for the first time
Prepare the Human Activity Recognition Data using AML Workbench
In this lab we use the Human Activity Recognition Data from its source: http://groupware.les.inf.puc-rio.br/har#ixzz2PyRdbAfA. More info can also be found on the UCI repository. You can download the data from http://groupware.les.inf.puc-rio.br/static/har/dataset-har-PUC-Rio-ugulino.zip and extract the downloaded zip file to a convenient folder on your local computer.
The data has been collected during 8 hours of activities, 2 hours with each of the 2 men and 2 women, all adults and healthy. These people were wearing 4 accelerometers from LiliPad Arduino, respectively positioned in the waist, left thigh, right ankle, and right arm. This resulted in a dataset with 165634 rows and 19 columns.
- user (text)
- gender (text)
- age (integer)
- how_tall_in_meters (real)
- weight (int)
- body_mass_index (real)
- x1 (type int, value of the axis ‘x’ of the 1st accelerometer, mounted on waist)
- y1 (type int, value of the axis ‘y’ of the 1st accelerometer, mounted on waist)
- z1 (type int, value of the axis ‘z’ of the 1st accelerometer, mounted on waist)
- x2 (type int, value of the axis ‘x’ of the 2nd accelerometer, mounted on the left thigh)
- y2 (type int, value of the axis ‘y’ of the 2nd accelerometer, mounted on the left thigh)
- z2 (type int, value of the axis ‘z’ of the 2nd accelerometer, mounted on the left thigh)
- x3 (type int, value of the axis ‘x’ of the 3rd accelerometer, mounted on the right ankle)
- y3 (type int, value of the axis ‘y’ of the 3rd accelerometer, mounted on the right ankle)
- z3 (type int, value of the axis ‘z’ of the 3rd accelerometer, mounted on the right ankle)
- x4 (type int, value of the axis ‘x’ of the 4th accelerometer, mounted on the right upper-arm)
- y4 (type int, value of the axis ‘y’ of the 4th accelerometer, mounted on the right upper-arm)
- z4 (type int, value of the axis ‘z’ of the 4th accelerometer, mounted on the right upper-arm)
- class (text, ‘sitting-down’ ,’standing-up’, ‘standing’, ‘walking’, and ‘sitting’)
Before you can use the Human Activity Recognition Data as data set in Azure Machine Learning Studio you need to resolve the following issues:
- Azure ML Studio works with comma separated files. The original data file contains ‘;’ as separator and will therefore be not suitable for uploading.
- Azure ML Studio works with a dot ‘.’ as decimal symbol. The original data file contains comma ‘,’ as decimal symbol for columns how_tall_in_meters and body_mass_index.
- Column z4 contains an invalid value which needs to be filtered out.
Resolve these issues by preparing the data using Azure Machine Learning Workbench:
- Open Azure Machine Learning Workbench.
- Create a new workspace if you don’t have one already.
- Click on the “+” sign, followed by “New Workspace”.

- Give your workspace a name, for example “AMLWorkshopWorkspace”
- Click on the “+” sign, followed by “New Workspace”.
- Click File. New Project…
- Give your project a name, for example “AMLWorkshopProject”
- Select your Workspace
- Select “Blank Project” as template
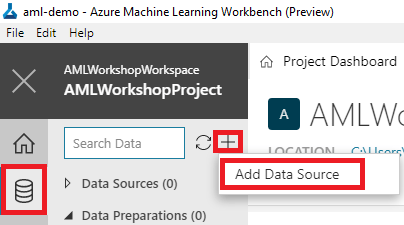
- Add the dataset-har-PUC-Rio-ugulino CSV file as Data Source
- Click the Data tab on the left and click on the “+” sign, followed by “Add Data Source”
- Select “File(s)/Directory” as Data Store
- Select “dataset-har-PUC-Rio-ugulino.csv” in the File Selection menu.
- In the File Details menu select
- “Semicolon [ ; ]” as Separator.
- “Don’t skip” as Skip Lines Mode.
- “Use Headers From First File” as Promote Headers Mode.
- In the Data Types menu use the defaults.
- In the Sample menu delete the current sample and then click “+ New” to create a new one. Use “Full File” as Sample Strategy.
- Click Finish to add the Data Source.
- Click the Data tab on the left and click on the “+” sign, followed by “Add Data Source”
- When inspecting the file you will identify some errors
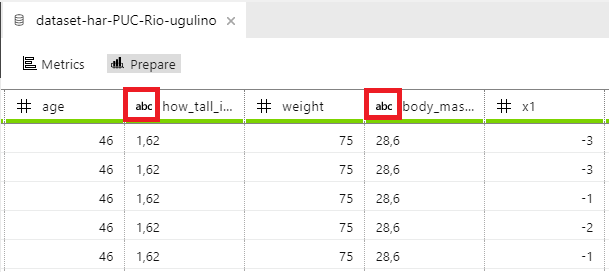
- Data Types of columns how_tall_in_meters and body_mass_index are text (abc) instead of numeric (#). This issue is caused because of the Comma “,” decimal symbol which is not supported.
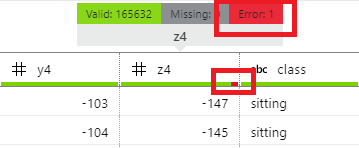
- There is 1 error in column z4.
- Data Types of columns how_tall_in_meters and body_mass_index are text (abc) instead of numeric (#). This issue is caused because of the Comma “,” decimal symbol which is not supported.
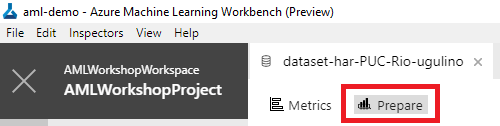
- Click “Prepare” to create a new Data Preparation Package
- Choose a Data Preparation Package Name, for example “AMLWorkshopDataPrep”
- Convert the Data Types of columns how_tall_in_meters and body_mass_index to Numeric by changing the decimal symbol.
- Right click column how_tall_in_meters and then “Convert Field Type to Numeric”
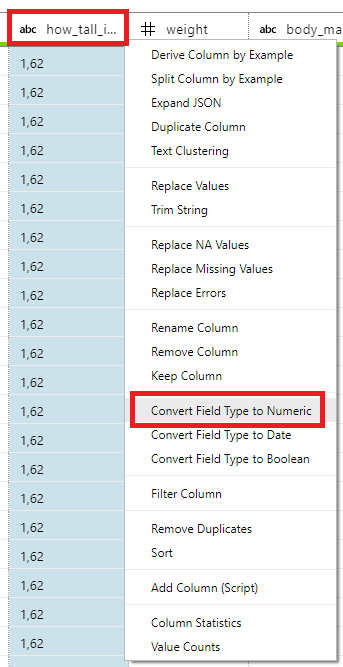
- AML Workbench now converted the values to whole numbers because it tried to use the default decimal symbol which is Dot “.”.
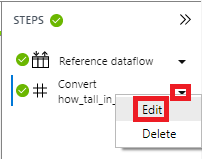
- In the right pane with data preparation steps, click the small arrow next to the Convert step followed by Edit
- Specify “Comma ,” as Decimal Symbol and then click on OK.
- The Data Type is now correct. Repeat these data preparation steps for column body_mass_index.
- Right click column how_tall_in_meters and then “Convert Field Type to Numeric”
- Now inspect what is wrong with the error value in column z4.
- Right click column z4 and then “Filter Column”.
- As Condition, choose If this column “is error” and click OK.
- Place your mouse icon on the Error in column z4 to see its value and what is wrong with it.
- Filter this invalid value out.
- In the right pane with data preparation steps, click the small arrow next to the “Filter z4” step followed by Edit.
- Change the Condition from If this column “is error” to If this column “is not error” and click OK.
- Export the file and use “Comma ,” as separator.
- In the top menu, click Transforms, followed by “Write to CSV”
- Enter a path and file name, for example “C:\Users\jorg\Documents\AMLWorkshop\dataset-har-PUC-Rio-ugulino_PREPARED.csv”
- Click OK. The prepared file will now be saved and is ready to upload to Azure Machine Learning Studio.
